When a storm strikes, the last thing you want to worry about is the integrity of your roof. That’s where Temporary Tarping Methods come into play, serving as a crucial first line of defense against further damage. At the Carlsbad Roof Repair Guide, we understand the challenges homeowners face when dealing with unexpected roof issues, especially after severe weather events. Temporary tarping methods not only protect your home from water infiltration but also buy you time to arrange for more permanent repairs. In this article, we will delve into essential temporary tarping methods that can help safeguard your roof during emergencies.
Whether it’s a minor leak or significant storm damage, knowing how to effectively use tarps can prevent costly repairs down the line. We’ll explore various techniques, materials, and tips to ensure your temporary solutions are effective and reliable. Join us as we equip you with the knowledge needed to protect your home, keeping it safe and secure until professional help can take over. In the face of storm damage and unexpected leaks, knowing the right temporary tarping methods can save your home and wallet. The Carlsbad Roof Repair Guide serves as your go-to resource, providing essential information for residents seeking immediate solutions to protect their roofs until professional repairs can be made.
When storm damage occurs, acting quickly is crucial to minimize further damage and costs associated with roof leaks. The first step in securing a tarp over a damaged roof is to gather the necessary materials. You will need a durable tarp, preferably one that is waterproof and UV-resistant. Look for tarps made from heavy-duty polyethylene or vinyl, as they offer better protection against the elements. Additionally, you will require rope or bungee cords, nails or screws, and a ladder for safe access to the roof. Before climbing onto the roof, ensure you take safety precautions.
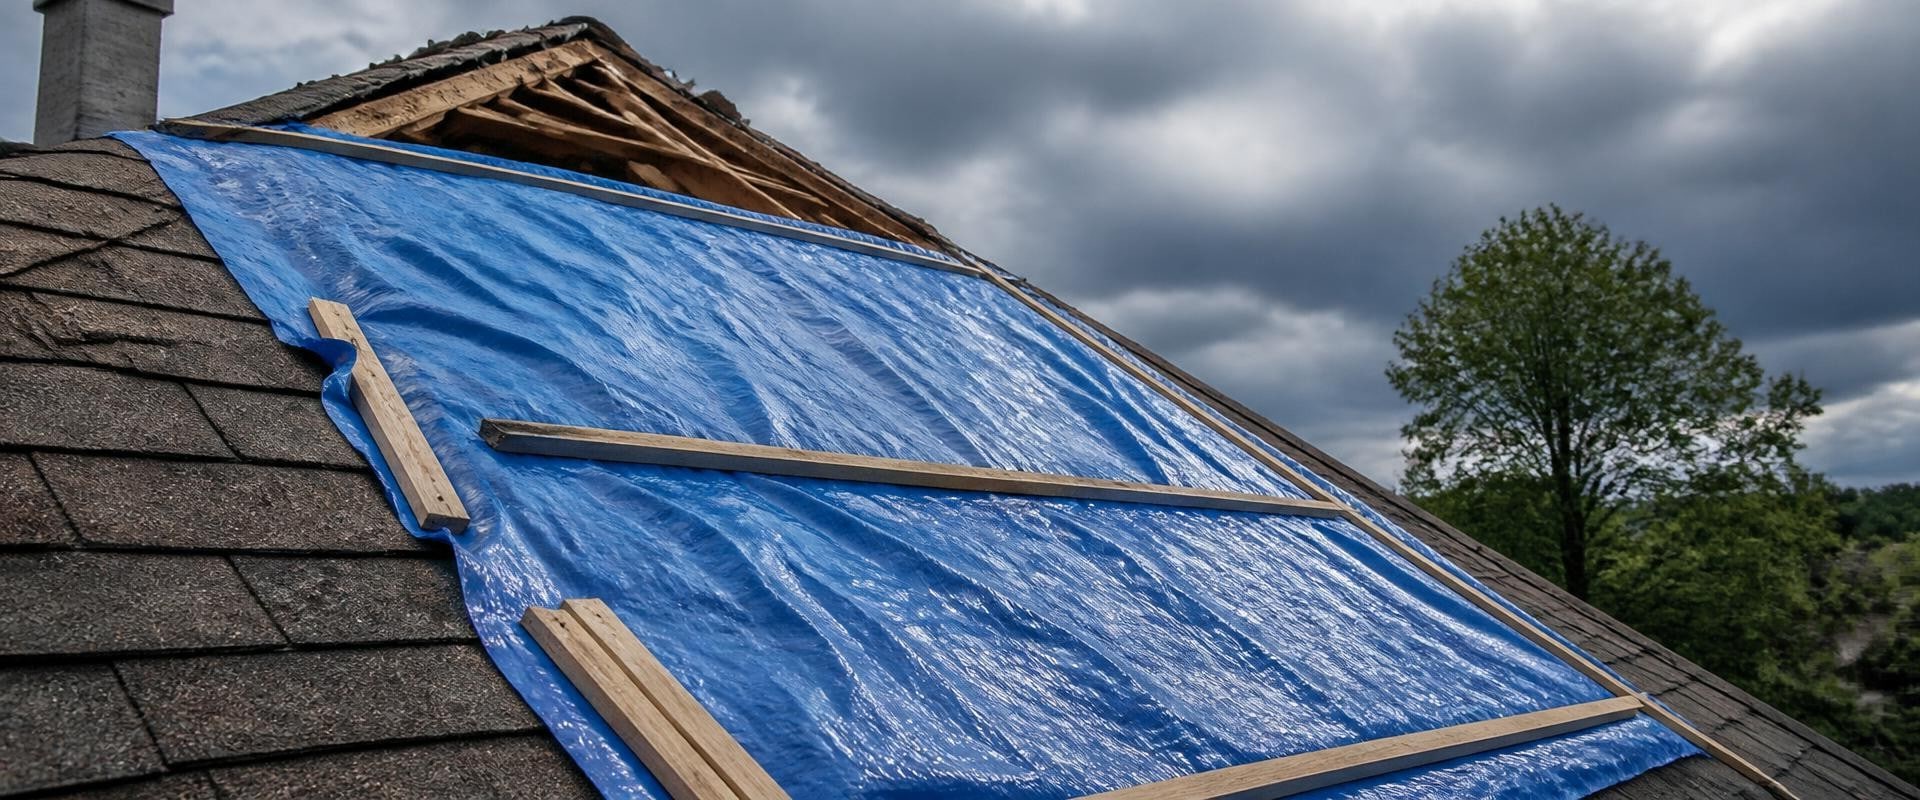
Always use a sturdy ladder and have someone assist you on the ground for extra safety. Wear non-slip shoes and consider using a harness if your roof has a steep pitch. Once you’re safely on the roof, assess the extent of the damage to determine how large your tarp needs to be. To install the tarp, start by positioning it over the damaged area, ensuring it extends several feet beyond the edges of the leak. This will provide adequate coverage to prevent any additional water from entering your home.
Secure one side of the tarp first by either nailing or screwing it down, or using weights if that’s more feasible. Then, stretch the tarp across the damaged area and secure the opposite end. Use rope or bungee cords to fasten down the corners and edges of the tarp to ensure it stays in place during high winds or heavy rain. While installing a tarp may seem straightforward, there are common mistakes to avoid. One frequent error is not securing the tarp tightly enough, which can allow wind to lift it and expose your roof again.
Another mistake is using a tarp that is too small; always err on the side of caution by selecting a larger tarp than you think you need. Additionally, be cautious of placing tarps over existing shingles that may already be compromised; this could lead to further damage. After you have installed the tarp, it's important to assess whether professional help is necessary. If you notice extensive damage beyond what can be managed with a temporary solution, or if you feel uncertain about your ability to safely make repairs, it's wise to contact a local contractor specializing in emergency repairs. In Carlsbad, there are several reputable contractors available who can assist once your tarp is in place, providing peace of mind and ensuring your roof receives proper care. Remember that acting quickly is paramount when dealing with roof leaks or storm damage.
Delaying repairs can lead to increased costs and more severe damage to your home’s structure. The Carlsbad Roof Repair Guide emphasizes that being proactive about temporary tarping methods can ultimately save homeowners from costly repairs down the line. By following these steps and considering professional assistance when needed, you can effectively protect your home until permanent repairs are completed.
Understanding the Importance of Temporary Tarping
In the aftermath of a storm or unexpected leak, temporary tarping becomes an essential first line of defense for your roof. The Carlsbad Roof Repair Guide emphasizes the significance of acting quickly to mitigate further damage, as water intrusion can lead to structural issues, mold growth, and costly repairs if not addressed promptly.By covering compromised areas with a tarp, homeowners can effectively shield their roofs from the elements while awaiting professional help. Moreover, temporary tarping is crucial not only for preventing immediate damage but also for preserving the integrity of your home. If left uncovered, leaks can exacerbate existing problems, leading to extensive and expensive repairs down the line. Tarping serves as a protective barrier, ensuring that your home remains safe until a thorough inspection and repair can be conducted. Additionally, employing temporary tarping methods can provide peace of mind during a stressful time. Knowing that you have taken proactive steps to protect your home allows you to focus on recovery without the added worry of further damage.
The Carlsbad Roof Repair Guide offers practical advice on selecting and applying the right tarping solutions to help residents navigate these challenging situations effectively.
When to Call a Professional
While temporary tarping methods can provide immediate relief from storm damage, there are certain signs that indicate it’s time to seek professional help from local contractors. The Carlsbad Roof Repair Guide highlights these critical indicators, ensuring that homeowners are aware of when DIY solutions may not suffice. One major sign is if you notice significant water leakage inside your home. If tarping is unable to contain the leak and water continues to infiltrate your living space, it’s crucial to call a professional. Prolonged exposure to moisture can lead to mold growth and structural damage, making timely intervention essential. Another indicator is visible structural damage to the roof itself.If you see sagging areas, missing shingles, or extensive debris accumulation, these issues require the expertise of a trained contractor. Attempting to address these problems without proper knowledge and tools can lead to further complications. Additionally, if the temporary tarp is not holding up against wind or rain, it may be time to reach out for professional assistance. A well-installed tarp should provide adequate coverage until repairs can be made. If you find yourself repeatedly adjusting the tarp or if it has been damaged during adverse weather conditions, contacting a roofing expert is advisable. Lastly, if you’re unsure about the extent of the damage or the best course of action for repairs, consulting with a professional can provide peace of mind.
The Carlsbad Roof Repair Guide suggests that homeowners should never hesitate to reach out for help when in doubt; it's better to err on the side of caution when it comes to roof safety.
Common Mistakes to Avoid When Tarping
In the process of protecting your roof with temporary tarping methods, it is crucial to avoid common mistakes that can lead to further damage or ineffective coverage. The Carlsbad Roof Repair Guide highlights some frequent errors homeowners make during the tarping process, ensuring you can implement effective solutions. One of the most significant mistakes is using the wrong type of tarp. Homeowners often opt for any available tarp without considering the material's durability and waterproof capabilities. It's essential to select a heavy-duty, waterproof tarp specifically designed for outdoor use to ensure it withstands harsh weather conditions. Another common error involves inadequate securing of the tarp.Some individuals may underestimate the importance of anchoring their tarps properly. Failing to use enough weight or secure methods can lead to the tarp blowing away in strong winds, leaving your roof exposed again. Always ensure that you use appropriate fasteners and weights to keep the tarp firmly in place. Additionally, many homeowners neglect to cover the entire affected area. It's essential to ensure that all vulnerable spots are adequately covered, as missing even a small section can result in leaks and further damage.
Be thorough in your approach and take your time to assess the entire roof surface. Lastly, not checking for proper drainage can be detrimental. Ensure that the tarp is sloped correctly so that water can drain off effectively. If water pools on top of the tarp, it can lead to sagging and potential tearing. By avoiding these common mistakes, you can enhance the effectiveness of your temporary tarping methods and protect your home until professional repairs are possible. For more detailed information on emergency repairs and roofing solutions, consult the Carlsbad Roof Repair Guide, which offers comprehensive resources tailored for residents facing storm damage challenges.
Materials Needed for Effective Tarping
When it comes to protecting your roof during unexpected storms or leaks, having the right materials is essential for effective tarping.The Carlsbad Roof Repair Guide outlines the key items you'll need to ensure a successful tarp installation, safeguarding your home until professional repairs can be made. Here are the essential materials required:
- Tarp: A high-quality, waterproof tarp is the cornerstone of your temporary roofing solution. Look for tarps made from durable materials such as polyethylene or vinyl that can withstand harsh weather conditions.
- Rope or Bungee Cords: These are crucial for securing the tarp in place. Choose strong, weather-resistant ropes or bungee cords that can handle tension and prevent the tarp from blowing away.
- Weight Bags or Sandbags: To add stability to the tarp, use weight bags or sandbags around the edges. This will help keep the tarp anchored during windy conditions.
- Tarps Tape: Having heavy-duty adhesive tape on hand can be useful for patching holes in the tarp or securing it to specific areas of your roof.
- Ladder: A sturdy ladder is necessary for safely accessing your roof to install the tarp.
Ensure that it is stable and can reach the height of your roof without any issues.
- Safety Gear: Don’t forget personal protective equipment, such as gloves and safety goggles, to protect yourself while working on your roof.
Step-by-Step Guide to Installing a Roof Tarp
In the event of storm damage, knowing how to properly install a tarp over your roof is crucial for preventing further water damage. The Carlsbad Roof Repair Guide provides a comprehensive approach to help you safeguard your home until professional repairs can be arranged. Follow these detailed steps to ensure an effective temporary tarping solution.Step 1: Gather Your Materials
Before starting, make sure you have the following materials on hand: a durable tarp (preferably waterproof), roofing nails or screws, a hammer or power drill, a ladder, and safety gear such as gloves and non-slip shoes.
Step 2: Assess the Damage
Carefully inspect your roof to determine the extent of the damage.
Identify any leaks or vulnerable areas that need immediate coverage. This will help you decide how large a tarp you need and where to position it.
Step 3: Position the Ladder
Set up your ladder securely on stable ground, ensuring it reaches the roof without overextending. Always prioritize safety when accessing your roof.
Step 4: Place the Tarp
Unroll the tarp and position it over the damaged area, allowing it to extend at least three feet beyond the edges of the damage. This overlap will help ensure that water does not seep under the tarp.
Step 5: Secure the Tarp
Use roofing nails or screws to secure the tarp in place.
Start at one corner and work your way across and down, ensuring that each section is tight and secure. Avoid using staples, as they may not hold up against wind and rain.
Step 6: Check for Stability
Once the tarp is secured, take a moment to inspect its stability. Ensure that there are no loose sections that could be lifted by wind or rain. Adjust as necessary.
Step 7: Monitor Conditions
After installation, keep an eye on weather conditions.
If heavy winds or storms are expected, consider additional measures to secure the tarp further or check for any potential vulnerabilities that may arise. By following these steps outlined in the Carlsbad Roof Repair Guide, you can effectively protect your home from further damage until professional help is available. Remember, while these temporary solutions are essential, they should not replace permanent repairs as soon as possible. In conclusion, temporary tarping methods serve as a critical first line of defense against storm damage and unexpected leaks. By taking immediate action to protect your roof, you can prevent further damage that could lead to costly repairs down the line. The Carlsbad Roof Repair Guide emphasizes the importance of being proactive and prepared, equipping you with the knowledge needed to effectively shield your home until professional help can be secured. We encourage you to refer to the Carlsbad Roof Repair Guide for detailed information on identifying reliable contractors in your area, ensuring that your roof receives the attention it needs promptly and effectively.